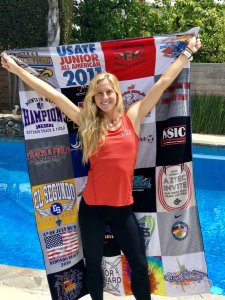
Learn to put your 20 beloved tee shirts into a small quilt. Quilt will measure 47″ X 59″ for a borderless quilt. We will use flannel and turn the quilt and do some stitch in the ditch quilting to hold the layers and to finish the quilt.
In Lesson 1 you will need interfacing , backing and thread. You can bring your machine or use mine. The first lesson will be a lot of prep. We will piece a few blocks in class and you will have home work. In the second class we will assemble the quilt by laying out the backing, sew on the backing and do a simple quilting. You will go home with a good understanding of how to complete your quilt. Great for beginners.
A sewing machine can be provided on request. Basic sewing equipment can also be provided for class. Please email me if you wish to bring your own machine or use mine. I will need to know the model and make of the sewing machine you own and are bringing, Thanks
Please tell me what day of the week you wish. Class is scheduled for 2 – 3 hour sessions 1:30pm to 4:30pm. I will confirm the schedule date you can start your session once you enroll and pay for class.Email me at jenny@jennys-sewing-studio.com if you have questions.
 To enroll in class for a tee shirt quilt click here. For a 20 block tee shirt quilt please purchase enough flannel to cover an area 52 X 62. You can purchase flannel 60″ wide or 45″ wide. Hobby Lobby does carry flannel . You will need to purchase either a light to medium weight fusible pellon interfacing ( about 7 or 8 yards) or an fusible knit interfacing. I suggest 2 packages. You will also need 1 large spool of Sew Oligy 100% polyester all sew thread. backing and bring thread to match. Here is the link to enroll!

The first step is to cut the sleeves off of the tee shirt and cut the sides so the tee shirt can be laid flat. We will be using about 15″ off the tee shirt center front or back. Steam press the tee shirt. I suggest we stabilize the tee shirt with a fusible interfacing like “cut and sew”or “fusi-knit interfacing”. You will need about 8 1/2 yards to complete 20 – 12″ blocks. I oversize the interfacing cuts to 15″ and fuse the interfacing in place. I then cut to fit using a 12 X 12″ ruler or template to be accurate. ( you can create a poster board 12″ square.)

Once stabilized, use a square up ruler or a see through ruler to fussy cut each tee shirt to approximately an 12” square. The remaining tee shirt would be discarded unless you want the scraps.
Next we will press the flannel backing and piece it if necessary and piece flannel to make sure it is big enough to back the top plus 2″ on each side. The edge of the quilt will be sewn and turned and pressed. The quilt top will be basted to the backing with safety pins. Minimal outline quilting will be done to hold the layers together using a walking foot.


You must be logged in to post a comment.